

Around every turn lies a story to be told. Whether it be historic, archaeological, geological, or the effects of glaciation, the KMTA area is rich with lessons. This section describes different sites that could be easily visited by school groups to learn more about the history (human and natural) along the road system of KMTA. This is certainly not a definitive list—there are many more sites than what has been listed.
![]()
Follow along online and download the field trip map to see
where to stop. Each number will coincide with the dropdowns
below. Or print off the entire lesson by downloading the full
lesson. Be sure to review the helpful notes as well.
![]()
![]()
HELPFUL NOTES BEFORE STARTING
NOTE 1: These sites can be divided into 3 classifications:
1. MUSEUMS: These are organized repositories of information.
2. INTERPRETIVE SIGNS: Road side signage that describes nearby history or geology.
3. INQUIRY BASED: These are “wild” sites that are either historic remains or geologic features. These are wonderful opportunities for inquiry-based learning. Rather than provide students with the information, each of these sites ask students to make careful observations then answer the question: “What’s Going On Here?” It’s up to the individual teacher to decide how much “help” to provide— whether this is directing what students should be observing or guiding them towards a viable interpretation.
NOTE 2: Time of year is critical. Most of these sites are realistically viewable in late spring or autumn. If the site is a museum, call ahead to check availability and price. In regards to wild sites, these are often buried if snow is on the ground. The window of opportunity can be very thin.
NOTE 3: Suggested equipment is provided to make the most of your visit to that site. Proper clothing for the weather and footwear for off road terrain should be considered as well. Considering Alaska weather, Rite in the Rain paper should be used for notes.
NOTE 4: Stress safety — for both the student and the resource. There are some sites that will be damaged if students don’t use proper care. In addition, some sites have safety issues. Cautions are noted in lessons, but these are not definitive.
#1 GIRDWOOD: ROUND HOUSE MUSEUM
Topic: ROUND HOUSE MUSEUM: GIRDWOOD
Location: Alyeska Ski Resort
Short Description: The Roundhouse Museum focuses upon the unique history of the Girdwood area.
Required Equipment: None
Suggested Equipment: None
Safety Consideration: None
Other Info:
• Entrance fee required. Call for more information (800) 880-3880
• Website
Potential Instructional Strategies:
The Roundhouse museum is unique from others on the Kenai Mountains-Turnagain Arm National Heritage Area in its altitude (2280 feet) and the focus upon the history and growth of the outdoor recreational industry of the area.
A visit to the Roundhouse Museum is certainly historic and spectacular.
#2 GIRDWOOD: CROW CREEK MINE (RESTORED GOLD MINING CAMP)
CROW CREEK MINE: RESTORED GOLD CAMP
Location: Girdwood: 2.7 Miles past Alyeska turn-off
Short Description: The Crow Creek Mine is a restored (and working) mining camp that was originally established in 1896. Now privately owned by the Toohey family, it provides an opportunity for visitors to peek into the life of a gold camp.
Required Equipment: None
Suggested Equipment: None
Safety Consideration: None
Other Info:
• Entrance fee required. Fee structure is based upon activities.
• Call for reservations and more information.
• (907) 229-3105 | Email: crowcreekmine@yahoo.com
• Website
• Seasonally Open: May 15—Sept 15.
Potential Instructional Strategies:
An excursion to the Crow Creek Mine would be an ideal companion to a trip to Hope Museum and/or to the Resurrection Creek site. Whereas these sites require the students to see beyond the rock piles and the faded photos/maps to imagine what living in a gold camp might have been like, the Crow Creek Mine provides the visitor not only a chance to see a recreated site but to try their hand at panning for gold.
The business offers many options for visitors and available dates are limited so call-in advance to plan your trip.
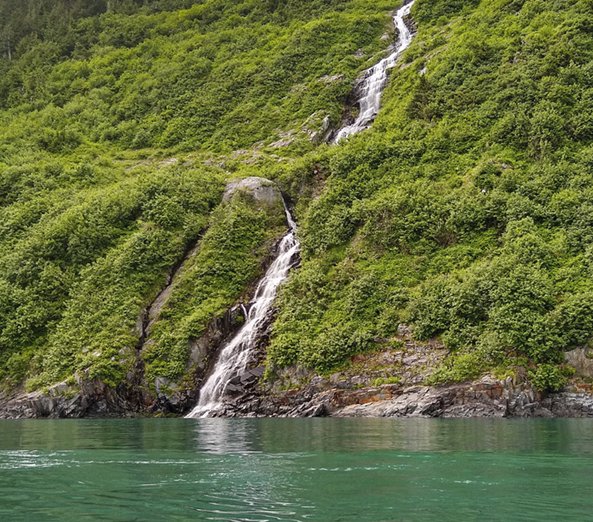
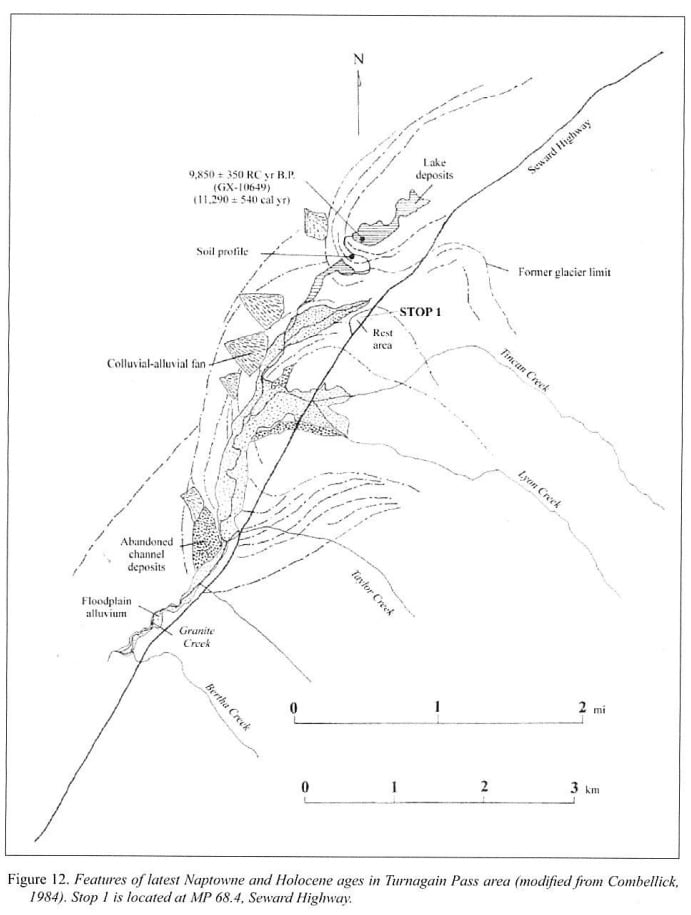
#3 TURNAGAIN PASS: INTERPRETING GLACIATION MORAINES
TURNAGAIN PASS: INTERPRETING GLACIAL MORAINE EVIDENCE
Location: Turnagain Pass – Mile 68.4
Pull into restrooms on northwest side of highway
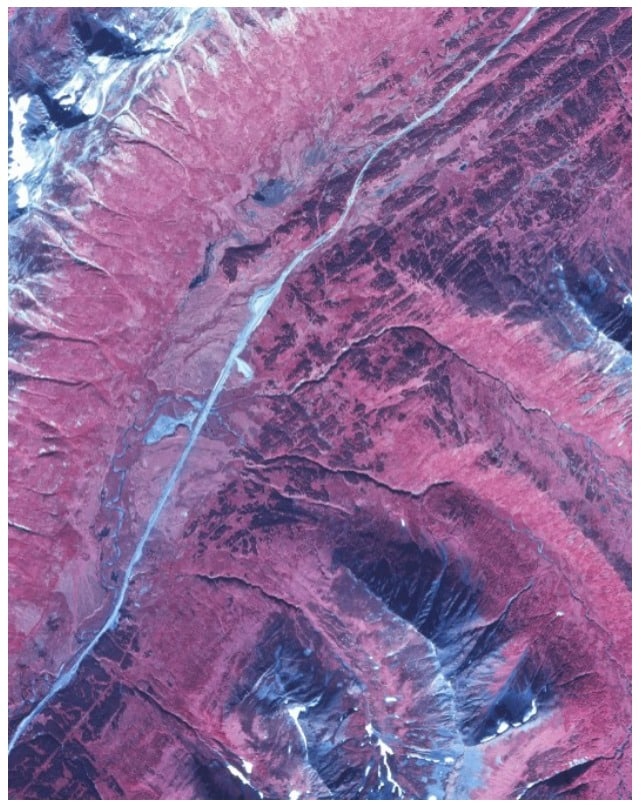
Short Description: Students will use observation skill and infrared aerial photography to decipher glacier and moraine development.
Required Equipment: Copies of Infrared Aerial Photograph of area (included)
Suggested Equipment:
• Binoculars for students
• Decent footwear for off trail hiking
• Compass
Safety Consideration: Relatively low risk factors. If students plan to explore area, shoes/boots appropriate for wet muskeg environment recommended.
Other Info:
• Pit Toilets on Site
• Low clouds will obscure important mountain visuals
Inquiry Prompts: What’s Going On Here?
There are a number of clues that make this a instructionally rich area. Among these are:
• Wide U– Shaped Valley
• Glacial Moraines throughout valley
• Glaciated valleys to the Southeast (but not to the Northwest)
• Striations on Mountainsides (particularly to the south)
• Debris “cones” below drainages to the north.
There may be other clues but make sure students make the above key observations (both on the ground and from aerial photo. It is helpful to mark moraines and debris cones on aerial photos.)
But alas . . . the story.
The Turnagain Pass Valley illustrates several complex geologic relations. Any self respecting Alaskan student can easily see that the main Turnagain Pass valley (graphically steep and U—shaped) is our run of the mill glacially carved valley. Likewise, the gravel piles on the valley floor are moraines that are the result of glaciation. This much is true. However, after walking through the area, the students will note that the moraines don’t really align with a glacier running the length of the valley. In fact, if students would identify and trace landscape shapes on the aerial photograph another story would emerge.
If viewed carefully, the aerial photo suggests that the moraines may have been pushed from the south (they were) and indeed the remnants of a possible old stream bed against the base of the mountains to the north (it was). . .
The Rest of the Story:
The story of Turnagain Pass is a complex and complicated series of glaciations. The valley was originally dredged out during past glaciations. The glaciations widened the broad valley of Turnagain Pass, which eventually became the thoroughfare for the Seward Highway. Trim lines and striations on the south wall of the valley add further testimony not only to this era but to also the thickness of the ice.
The moraines, however, tell a different story of later glaciation. Some 11-12,000 years ago during the final phases of the Elmendorf stage of the Naptowne glaciation, glaciers developed in the valleys (Tincan, Lyons, and Ingram) to the south. It was these glaciers that carved out these valleys resulting in the moraine debris fields. In the farthest extent of this ice (as evidenced by the infrared enhanced photo) the valley stream was pushed against the mountains to the north creating an isolated stream bed diverted by an ancient wall of ice.
A student might bring up the question, “How come the glaciers came from just one side of the valley? What’s up with that?” Indeed, what IS “up with that?” In order to create a glacier one must have persistent snow pack . . . snow that doesn’t melt during the “off season.” A quick look at the compass reveals which mountain is north facing (ok, north-west facing) versus south facing. Indeed, there are a number of examples on the Kenai Peninsula where glaciers originated from north facing slopes which gets less sunlight than its cross-the-valley south facing cousins.
And One More Thing:
Before hopping back on the bus, take one more look at the aerial map. Make note of the cone shaped features on the north wall of the pass. Each of these originates at the terminus of a drainage. Careful, these are not alluvial fans formed by water (they are much too steep). The cause is the flow of snow…avalanches that annually cascade down these slopes. All the slopes are susceptible to sloughing snow, however the V-shaped drainages magnify the debris material down the chute and to the terminus where it hits the valley floor. The result? A steep cone of course rock debris which builds with each winter cycle.
These debris cones are a handy way to remind students the perils of traveling in the corridors. Travelers (both early and modern) have had to deal with the perils of avalanches. To the present-day traveler it may mean delays when avalanches close the highway or caution when recreating in the back country. However, to earlier travelers although winter offered easier travel through the alders and over marshes, the threat of avalanche was very real. And very deadly. Not far from this valley, at the Lynx Creek mine, six men were buried (five perished) at the turn of the century when a slide ripped through the camp.
Large-format aerial map
Map plus glaciation diagram
#4 PRT 1. HOPE CUTOFF: INTERPRETATIVE SIGNS OF GOLD MINING IN AREA
CANYON CREEK PULL OFF: GOLD MINING ON THE KENAI
Short Description: In many ways this area was ground zero for the mining activity in this area. Interpretative signs provide a wealth of information. Canyon Creek Bridge provides unique opportunity to see “old” Seward Highway.
Required Equipment: None
Suggested Equipment: Notebooks. Tape Measure
Safety Consideration: Steep cliffs into gorge. At Forks, rushing high volume streams.
Other Info: Pit Toilets are available at turn off and on way down to the Forks.
Instructional Opportunities: Mining
The “top” parking area provides a huge wealth of interpretative signs discussing the mining activity in this area. Signage discusses the area history, mining methods, and various personalities. This stop should be joined with a visit to Hope and to the mining site at Resurrection Creek.
After reading the signs, a visit to the creek below the bridge might be in order —access is from the Hope Highway. The road is gravel and somewhat steep but is bus accessible with a turnaround at the bottom.
Although there is little evidence of the former bustling mining activity, this stop provides a lovely lunch spot to contemplate the history of the area.
Caution: The confluence of Canyon Creek and Six Mile is very turbulent with eroded unstable banks. Avoid the area down river from the parking lot.
Don’t forget the bridge.
Much of the Seward Highway has been rebuilt in the 1990s to the present. A visit to the Canyon Creek bridge provides insight to the perilous nature of the road prior to new construction. (This can be accessed from the parking lot with the interpretative signs.)
The section of road from this point toward Summit was referred to as the “Luge Run” because of its narrow, twisty, and icy nature. Imagine driving, in the winter across this bridge. A common superstition was that the passengers (not the driver) upon approaching the bridge would shut their eyes and hold their breath while crossing.
It’s no wonder that the bridge held that kind of respect. Measure the width of the roadway here, then when returning to your bus measuring the width of your bus and multiply by two. Compare the measures to see why it was unnerving for two large vehicles (buses or semis) to meet on this bridge in the winter.
#4 PRT 2. HOPE CUTOFF: OLD CANYON CREEK BRIDGE
CANYON CREEK PULL OFF: GOLD MINING ON THE KENAI
Short Description: In many ways this area was ground zero for the mining activity in this area. Interpretative signs provide a wealth of information. Canyon Creek Bridge provides unique opportunity to see “old” Seward Highway.
Required Equipment: None
Suggested Equipment: Notebooks. Tape Measure
Safety Consideration: Steep cliffs into gorge. At Forks, rushing high volume streams.
Other Info: Pit Toilets are available at turn off and on way down to the Forks.
Instructional Opportunities: Mining
The “top” parking area provides a huge wealth of interpretative signs discussing the mining activity in this area. Signage discusses the area history, mining methods, and various personalities. This stop should be joined with a visit to Hope and to the mining site at Resurrection Creek.
After reading the signs, a visit to the creek below the bridge might be in order —access is from the Hope Highway. The road is gravel and somewhat steep but is bus accessible with a turnaround at the bottom.
Although there is little evidence of the former bustling mining activity, this stop provides a lovely lunch spot to contemplate the history of the area.
Caution: The confluence of Canyon Creek and Six Mile is very turbulent with eroded unstable banks. Avoid the area down river from the parking lot.
Don’t forget the bridge.
Much of the Seward Highway has been rebuilt in the 1990s to the present. A visit to the Canyon Creek bridge provides insight to the perilous nature of the road prior to new construction. (This can be accessed from the parking lot with the interpretative signs.)
The section of road from this point toward Summit was referred to as the “Luge Run” because of its narrow, twisty, and icy nature. Imagine driving, in the winter across this bridge. A common superstition was that the passengers (not the driver) upon approaching the bridge would shut their eyes and hold their breath while crossing.
It’s no wonder that the bridge held that kind of respect. Measure the width of the roadway here, then when returning to your bus measuring the width of your bus and multiply by two. Compare the measures to see why it was unnerving for two large vehicles (buses or semis) to meet on this bridge in the winter.
#5 HOPE MUSEUM: MINING HISTORY
HOPE MUSEUM
Short Description: The Hope Museum provides a glimpse into the colorful world of the Hope/Sunrise Gold Rush. The museum hosts several buildings and tools from the time period.
Required Equipment: None
Suggested Equipment: Notebooks.
Safety Consideration: None
Other Info:
• Contact the Museum prior to trip: hopehistoricalsociety@gmail.com | (907) 782-3740
• Is not open in winter — call ahead to arrange a viewing date.
• Website
Instructional Opportunities:
Hope and Sunrise were the supply ports for the mining activity for the Forks and regions beyond. This trip could be in conjunction with Trails Across Time Chapter 5 and the lesson “Tale of Two Cities.”
The Hope Museum, and the town of Hope itself, provides a wonderful opportunity for students to feel the epicenter of the gold rush in the Kenai Mountains-Turnagain Arm National Heritage Area. The museum is a treasure trove of photos, documents, and artifacts from the time period. On site are several original buildings that visitors can wander through. In addition, there are a number of tools and implements from the mining industry.
The town of Hope is often called the Garden Spot of the Kenai. The narrow roads, the period buildings, and the lush vegetation make this a marvelous opportunity to sense the former vibrancy of the area.
#6 RESURRECTION CREEK: EVIDENCE OF HYDRAULIC MINING STRATEGIES
RESURRECTION CREEK: 3.9 MILES SOUTH OF HOPE
Topic: Hydraulic Mining Strategies
Short Description: This area was (and still is) exploited for placer gold at the turn of the century. Students can observe physical remains to get a sense of strategies used for hydraulic mining.
Required Equipment: None
Suggested Equipment: Notebook, camera
Safety Consideration: Brown Bear and Moose Habitat
Other Info: Single Pit Toilet
Helpful Resources:
• Hope Museum (well worth a visit prior to this site)
• Trails Across Time: Chapter 5
• ICMJ Mining Journal Web Site
Inquiry Prompts: What’s Going On Here?
This area is opportunity rich for observing techniques and long term effects. This lesson will focus upon the small area around bridge, however this entire valley has been, and still is, being mined. Encourage students to make their own observations and interpretations.
Here are some key points for observations:
From Parking Lot: Compare mountains on east vs west
From Bridge: Look carefully along bank for unusual, unnatural rock placement.
On Trail:
• Observe changing tree size/age.
• Observe change in terrain
• Observe other unnatural landscape features.
The Story:
No doubt the students will find many more features than what are mentioned in this lesson. The key thing is that this area was heavily mined for placer gold, the flakes and nuggets laying in outwash gravel. In order to get to the gold bearing gravel, the overburden (material resting above gold bearing levels) basically had to be removed. This is why this area looks like it has been turned up side down.
But alas . . . the rest of the story
From the Parking Lot:
Careful observation will show that the mountains on the east appear a bit different than the mountains on the west. This is because Resurrection Creek valley is the suture zone separating the gold-laden Valdez complex on the east and the gold-barren McHugh Complex to the west. Looking at the map on page 62 of Trails Across Time students can get a sense that all the rich placer and lode operations were in the Valdez Complex.
From the Bridge:
This is a tough one. Careful observations may reveal several circular or semicircular rings of large rock along the margins of the creek. These are prospect holes– exploratory pits to see if any gold has “pooled” under the larger rocks. The large rocks are removed and placed near the rim of the pit. These features are from recent mining exploration.
The Trail:
• Terraces: Several terraces will be encountered. These are levels from which the overburden material were sluiced in the search for placer gold.
• Trees: Tree size and apparent age will provide clues to the extent of dredging. Keep walking until old growth trees (over 100 years) are observed.
• Coyote Holes: Small holes dug into ground. These are recent prospect holes that were dug during the search for gold that was left after the original mining operations.
More Time to Go Up River?
This entire valley was once a thriving industrial area of mining. Look around for more signs of this time period by looking for old machine parts, ruins, and evidence of activity.
#7 MILE 56.6 – GEOLOGY: LAND SUBSIDENCE
DYNAMIC EARTH SUBSIDENCE
Location: Mile 56.6 Just South of Hope Cut Off
Short Description: As you leave Hope Junction going south; take note of the hillside on the right. There is no good place to park; no good place for students to disembark bus, however it is still a interesting visual.
Required Equipment: None
Suggested Equipment: None
Safety Consideration: No place to park except on shoulder
Other Info: None
Inquiry Prompts: What’s Going On Here?
Have students take a gander at the hillside. The entire hillside should look “wrong”. They may not even be able to describe why… it just doesn’t look right. Look at the trees, look at the ground, look at the exposed rock. Something just doesn’t look right. In contrast to stable road cuts, these exposures look broken up and pieces of rocks look like they have shifted relative to one another. What’s going on here?
The Rest of the Story:
This hillside is failing. Not just the ground setting on the bed rock, but indeed the entire bedrock is failing and slowly (currently) working its way down the hill.
All along the Kenai Mountains-Turnagain Arm National Heritage Area, it is not uncommon to see large swaths of soil slip from its bedrock anchor (especially during severe wet stretches) but this is different. This is actually the bedrock that is splintering.
Eventually, hopefully not while your bus is parked there, gravity will win and the stress will cause the hillside to end up on the road. It’s a reminder that this is a very dynamic and ever-changing landscape.
#8 MILE 54 – WIBLE HYDRAULIC MINING FLUME
EVIDENCE OF HYDRAULIC MINING
Location: Mile 54 Large turn-out
Turn into Large Pull-off on the East Side of Road
Short Description: Visuals of this are very subtle, however, it provides a good overview of how hydraulic mining achieved the necessary head pressure.
Required Equipment: None
Suggested Equipment: Binoculars might be handy
Safety Consideration: None
Other Info:
• Low Clouds will obscure view of flume
• Interpretative panels explain flume
• Note other geologic features
Resources:
• See Redoubt Reporter site (http://redoubtreporter.wordpress.com). Go to Wible Article (Oct 12, 2011)
Inquiry Prompts: What’s Going On Here?
Prompt students to look REALLY hard for something that just doesn’t “look” right. Something that doesn’t quite look natural. Need more help? Look at the alders on the far side of hill… anything yet? Maybe someone will point out some sections of alders that grow in a thin tight horizontal band. This is what is left of the Wible flume: a pipe that supplied water from the drainage on the right to the gold camp on the left (see interpretation panels at south end of pull off for a map showing this locations of camp and water source.)
Simon Wible and his operation is further discussed in Trails Across Time (page 63) and extensively on Interpretation Panels at the Canyon Creek stop.
But There’s More…
Look around the mountain sides above the Wible Flume for signs of glaciation. First, you’ll note striations on the face of the mountains. These striations are caused by the scraping motion of the moving masses of ice (that in turn ultimately formed the classic U-shaped valleys). Those striations can be found nearly to the top of the mountains suggesting that at one time the ice in this area was 3,000 feet thick.
Look also in the saddles of the mountains where cirque glaciers used to fill. Here, and in other locations viewed from the road, you’ll see recessional gravel moraines that are particularly sharp and well defined… almost knifed edged. These are called “ice cored moraines” and as their name suggests retain their precise shape due to the hardened inner ice core. Enjoy these now, for as the climate warms these features will gradually melt internally and soften their sharp edges.
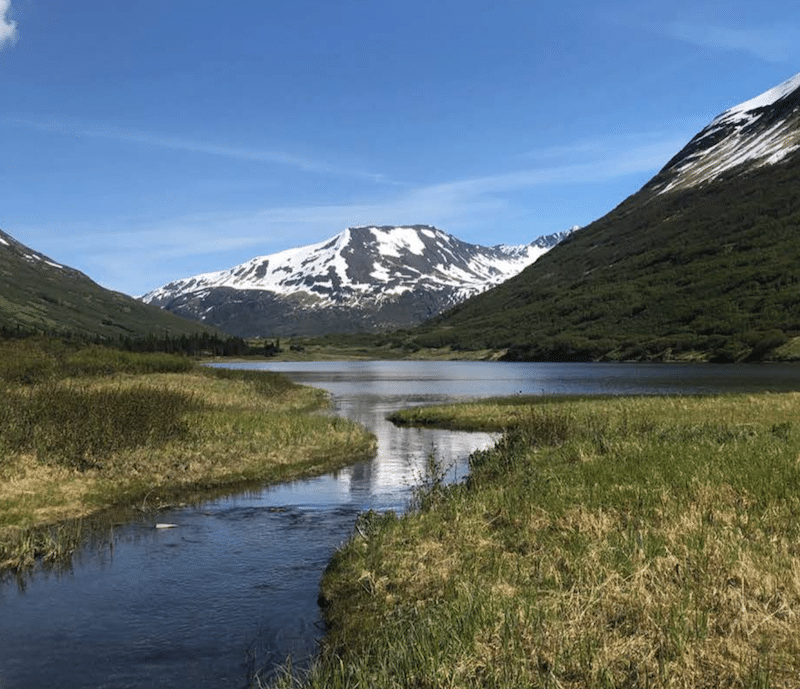
#9 SUMMIT LAKE: EFFECTS OF GLACIATION
SUMMIT LAKE
Landforms Resulting from Persistent Post-glacial Ice
Location: Approximately Mile 45: Summit Lake Pull-off
Pull off midway on Upper Summit Lake (south of lodge)
Short Description: Benches above lake provide clues to a different type of glacial history.
Required Equipment: None
Suggested Equipment: None
Safety Consideration: Pull-off is adjacent to busy highway
Other Info: None
Inquiry Prompts: What’s Going On Here?
Prompt students to consider the slope immediately rising up from the shore of the lake. Is there anything that is different about this slope? There are two visual clues that students need to focus upon:
• Slight bench above Summit Lake (that disappears some ways after lake so therefore can be assumed to be associated with lake.
• Faint alluvial fans coming down to bench.
At first glance it doesn’t seem too much of an issue; just a bench above the lake. But alas, trying to explain it might be a bit confounding. Glaciers have certainly had a profound effect in this valley (as evidenced by the classic glacier U-shape and the striations on the sides of mountains). Could this bench just be your run-of-the-mill glacial moraine? No, something else is happening here.
The Rest of the Story:
Indeed the bench and related alluvial fans are glacier-related. It was the end of the Naptown glaciation (some 12,000 years ago) that the glacier that once occupied this valley melted. The last remnants of that glacier was a shadow of its former self (the area of Summit Lake). The melting slowed and movement ceased— the ice persisted, Prior to melting entirely, rock loosen from above fell and formed a colluvial fan at the margins of this shrinking form that once was a proud and mighty glacier. The faint colluvial fans provide further evidence of this geologic phenomenon.
#10 MILE 49 – GILPATRICK LODE MINING OPERATION
HARD ROCK MINING ON THE KENAI: The Gilpatrick Lode Operation
Location: Milepost 49, Seward Highway
Large Gravel Pit… Keep driving through pit to reach northern side. This will provide the best visuals
Short Description: Mountain sides are crisscrossed with former mining roads leading up to hard rock mining operations.
Required Equipment: None
Suggested Equipment: Binoculars, Trails Across Time pg 62 (map of Kenai Mining)
Safety Consideration: None
Other Info: Access into and around gravel pit is bus friendly. Best visuals from gravel pit is on the far north side of pit. The visual clues are on the mountain sides to the west. This is a great place for lunch; lots of room for kids to stretch their legs.
Inquiry Prompts: What’s Going On Here?
Have students look around for something out of place (other than of course the gravel pit which is another story). On the mountainside to the west are several lines of alders zigzagging across the face. Students may have noticed this pattern on several mountainsides in the area.
These lines of alders are evidence of mining roads leading upward to hard rock operations far above. This particular operation was named the Gilpatrick and Sprague. It was in operation during the early part of the 20th century.
But alas . . . there’s much more.
First Question: Why a band of alder delineating the old road? Alders quickly grow in disturbed and compromised areas (the alder will be the first to grow following the recession of a glacier.) Because of this, a sudden grove of alders can suggest a historic site… such as a road.
Next Question: Why are the historic claims in 1910 in a straight north/south row? Simply, this is where the vein of quartz that is gold bearing precipitated. The gold and quartz minerals were in solution under intense high and pressure. The solution traveled through fault zones in the rock where eventually either heat or pressure (or both) diminished causes the minerals to precipitate out of solution. The mining operations followed this line of mineralization.
Perhaps another question: But these roads go so far up into the mountains— thousands of feet. Seems it would be easier to mine lower. If would be easier… if the vein was there or if it was exposed. However, because of the location of the vein and the fact that anything lower would be buried under depositional layers, the operations were established where the gold was accessible.
One last question: What about the valleys between the claims . . . what’s up with that? The gold bearing seam was once continuous. Through plate tectonics these terranes were docked here, then uplifted. Erosion (water, glaciers, earth movement) created these valleys which effectively dispersed the material (bed rock and seams of ore) into the valleys. It is this depositional material from which placer deposits are prospected. The rich ores from the Forks area originated (a long time ago) here in these seams of ore.
#11 TERN LAKE: GEOLOGY AND EFFECTS OF ROAD CONSTRUCTION
GEOLOGY AND THE EFFECTS OF ROAD CONSTRUCTION
Location: TERN LAKE: Mile 0 of Sterling Highway – Just West of Junction
Short Description: This stop has a two purposes: to observe a slow motion sloughing of a mountain and confront what we take for granted actually was a result of human disturbance.
Required Equipment: Photo of Mountain, Old Map of Area (included),
Suggested Equipment: Binoculars
Safety Consideration: None
Other Info:
• Mountain visuals will be obscured by low clouds.
• If desired, instead of the pull-off, a picnic area is located 1/4 mile down the Sterling Highway with pit toilets.
Inquiry Prompts: What’s Going On Here?
1) The Mountain behind Tern Lake:
This is a tough observation, however, take a look at the top third of the predominate mountain to the south. You’ll note a bulge a third of the way down the right (west) side of the mountain. Just another feature? Or is something going on? Something is going on. This section of the mountain is unstable and is slowly creeping down the mountainside. It likely has been happening for many, many ages. Likely it is a result of over-steepening of hillside by glacial scouring. However there will come a time (just like the hillside south of Hope Junction) where gravity will win. It isn’t without precedent. These massive failings have been famously documented many times such as in Lituya Bay and in Glacier Bay in the summer of 2012. Although not of these magnitudes, the collapse of this shoulder above Tern Lake would certainly have an effect in this valley.
But there’s more:
So, something happened between the time the map was drawn to now to create this lake. And that something was the construction and modernization of the Sterling and Seward Highways. These highways constricted the flow of water creating this lovely shallow lake. However, it perhaps wasn’t always lovely. Imagine what the area looked like prior to the succession of marsh plants. Perhaps the original name for Tern Lake would help— Mud Lake.
Perhaps it took awhile, however little did anyone realize during the construction phase that the resulting lake would be a favorite spot for swans in the summer, and skaters in the winter.
#12 COOPER LANDING MUSEUM
COOPER LANDING MUSEUM
Topic: Prehistory to Current Local History
Location: Mile 48.7 Sterling Highway
The museum is between the bridge and Gwin’s Cafe
Short Description: The Cooper Landing Museum offers a broad view of the local history. Perhaps the most unique feature is how the Cooper Landing Museum delves into local personalities of former settlers.
Required Equipment: None
Suggested Equipment: None
Safety Consideration: None
Other Info:
• Jack Lean and Mona Painter are personalities that were showcased in the By-Ways and Highways portion of the curriculum. It would be advantageous for students to have completed this lesson prior to a museum visit.
• Limited Season and Hours: Call for availability (907) 598-1042 (painter@arctic.net)
Instructional Opportunities:
The first thing that greets a visitor when they enter the Cooper Landing Museum is the articulated brown bear skeleton created by Cooper Landing students under the guidance of teachers Sheryl and Ed Sotelo. (Can you find the recreated bones in the skeleton?) The second being the personal nature of the museum. Here are letters and photographs of not only the founders of Cooper Landing but also those who knew them— some who are current members of the Cooper Landing Historical Society. The close connection to the founding of this area is a trait shared by all the community museums in the Kenai Mountains-Turnagain Arm National Heritage Area. But it certainly resonates particularly true in the Cooper Landing Museum.
Here students have the luxury of conducting authentic research of the area’s history using primary resources. Volunteers at the museum can provide hundreds of letters, photographics, documents, and stories from their past. The Cooper Landing Museum, like all of the community museums in the Kenai Mountains-Turnagain Arm National Heritage Area, is a treasure for students at any grade-level wanting a crack at coming face-to-face with history.
#13 WELL PRESERVED PREHISTORIC HOUSE PIT
ARCHAEOLOGICAL SITE: PRESERVED HOUSE PIT
Location: Alaska River Company – Mile 50: Sterling Highway
NOTE: Sharp, blind curve: Suggest Approach from East. Leave to the West
Short Description: The area around the Russian River is covered with archaeological sites and house pits. The house pit located on Alaska River Company private land is perhaps the best preserved that can be easily studied. Because it is on private land special consideration MUST be made.
Required Equipment:
• 2 Tape measures (20 foot minimum)
• Clipboards with graph paper.
• 1 foot straight edge could help with drawings.
Suggested Equipment: Camera
Safety Consideration: The main consideration is safety of the RESOURCE and the BUSINESS. Follow directions CAREFULLY.
Other Info: This is a private business. Access MUST BE PREAPPROVED.
FIRST CONSIDERATION: Alaska River Company has given permission for groups to view the site however they MUST BE notified in advance (1-888-595-1226). This is a working raft/fishing company. Space for customers is very limited. Plan to keep visit succinct. Be mindful of the paying customers.
SECOND CONSIDERATION: This visit should be done in conjunction with a visit to the nearby K’Beq’ cultural interpretation site. It is suggested that students should first visit the Alaska River Site to try to explain the features of the house pit, then use a visit to the K’Beq’ site to compare findings.
THIRD CONSIDERATION: This is an example of superb stewardship of a resource. Although this house pit is in the middle of the businesses operations, they’ve taken special care to keep this site preserved. As a result, it is one of the finest examples of a house pit in the area. Help protect the resource. DO NOT COME WITHIN 3 FEET OF HOUSE PIT.
LOCATION: The house pit is located to the left of the AK River Company dock.
SUGGESTED INSTRUCTION: Again, NO ONE (teacher or student) should enter house pit area.
Keeping three feet from the house pit, lay down tape measures along two adjacent sides.
Using these tapes as guides, replicate the outline of the house pit on graph paper (before determine the scale (1 square = ___ inches/ft.). Measurements won’t be perfect; we want to get an estimation. These measurements will become more meaningful after students visit the K’Beq’ site and find out what the various structures were used for.
After mapping, try to imagine what the various structures were used for. Identify entry ways, sleeping quarters, cooking area, etc. How many people might this house shelter?
Before leaving, make sure to thank the people of the AK River Company for allowing access and for taking such good care of this important resource.
#14 COOPER CREEK- EFFECTS OF HYDRAULIC MINING
EVIDENCE OF HYDRAULIC MINING TECHNIQUES
Location: Mile 50.5 Sterling Highway. Pull into Cooper Creek Campground or Two Brothers
Short Description: The hillside at this sight is half way eroded and gone. This is a result of using giants to remove the overburden from placer deposits. A walk up toward the base of the hill will provide lessons to the long term impacts of this mining technique.
Required Equipment: None
Suggested Equipment: None
Safety Consideration: Brown bear, moose habitat
Other Info: Campground has toilet facilities. Nice area along creek for lunch or a rest. Plenty of room to wander. However this area is frequented by brown bear.
Inquiry Prompts: What’s Going On Here?
The hillside can be viewed from Sackett’s Grill or a short distance from the highway into Cooper Creek Campground.
Ask students to take a look around for any hints of mining activity. This one isn’t so subtle, however, it may at first be confused with a road cut or some other kind of disturbance.
This area used giants (which can be seen at the Cooper Landing Museum and also at Hope) to remove the overburden from the placer gold bearing layer. If you’ve been to the Resurrection Creek area this will provide an opportunity to compare the two areas.
Water for the giants was provided by a flume which originated upstream in Cooper Creek. These flumes caused the build up of pressure which in turn blasted away the hillside.
Viewing this one can also see the long-term downside of this strategy. This area has been heavily impacted with silt. Take a moment to access the strategies that the forest service is taking to keep the silt from entering the Kenai River.
It’s a good time to discuss how silt issues compromise salmon habitat— particularly in the productivity of the redds— the aquatic “nests” where the eggs are deposited.
#15 K’BEQ NATIVE CULTURAL CENTER
PREHISTORIC ARCHAEOLOGICAL INTERPRETIVE SITE
Location: K’Beq’ Interpretive Site – Mile 52.6 Sterling Hwy
Access is directly across highway from Russian River CG
Short Description: The K’Beq’ Interpretative Site provides a wonderful opportunity to learn about the area’s rich prehistory. The site has a small center with a model of a dwelling (which if you’ve visited the AK River Site will provide an opportunity to check student notes.
Required Equipment: Notes from AK River Site,
Suggested Equipment: Flagging, tape measures
Safety Consideration: None: Stay on boardwalk to preserve resource.
Other Info: Also at site is the Lindgren cabin; a restored cabin from the 1930s era.
Inquiry Prompts: What’s Going on Here?
Assuming you’ve gone to the AK River Site, use tape measures and flagging to recreate the dimensions of the house pit in the parking lot of K’Beq’. Solicit from the students what the various parts of the structure might be used for. Remember, there has to be a way to get into the dwelling, a place to sleep, a place to cook/keep warm, and a place to socialize. Then also consider the number of people that might live in a house pit this size. Try it on for size– think 4 people lived here? Put four people within the perimeter and see “how it feels.”
Now go into the interpretative center and view the model and ask questions of the attending guide.
Then go out to view the house pit at the K’Beq’ Site. You’ll notice that it is not nearly as distinct as the one at the AK River Site. More importantly you’ll note a large hole dug in the middle. This wasn’t natural but rather was from someone digging a “coyote hole” prospecting for placer gold or someone looking for artifacts which is highly illegal!
You’ll also note some partially buried plastic which denotes disturbed ground from an archaeological pit.
So What’s Going On? The rest of the story.
The Russian River area is incredibly rich with pre-historical sites. There are hundreds of house pits similar to this one in the area. This was inhabited during several eras by different groups including the Chugach Sugpiaq from Prince Williams Sound and the Kenaitze group from the area. The reason that they came is the same reason so many people still come to this area: the fish.
If you haven’t done so already, it’s a good time to pull out the lesson discussing the mystery behind the two sockeye runs of the Russian River.
#16 VIEW OF CONVERGING CORRIDORS
CONVERGENCE OF CORRIDORS
Location: Ball Park just North of Moose Pass: Turn off toward Lake
Alternative Site: Trail Lake Fish Hatchery
Short Description: This is spot is an ideal overview to emphasize the connection between geology and transportation corridors. At this site one can see the convergence of two wide valleys —zones of crustal weakness created when assembling the Chugach Terrane.
Required Equipment: Maps of Peninsula showing highways and rail routes.
Suggested Equipment: Binoculars
Safety Consideration: None
Other Info: Visuals will be limited in low clouds. No bathroom facilities however great wide area for students to stretch legs and for lunch.
Inquiry Prompts: What’s Going On Here?
Stand on the shore of the lake making sure to have a complete view of the valleys leading to the south (toward Seward) to the East (the Highway Route) and to the North (the railroad and Johnson Pass Trail).
Ask the students what makes this spot different. If you’ve gone to other sites, then they may be looking for something subtle. But really, there’s nothing subtle about this spot. Upper Trail Lake is the result of the assemblage of crustal packages which ultimately became the Chugach Terrane to be transported north by plate tectonics. Even the shape of Trail Lake points like 3 arrows pointing down these wide valleys.
You’ve come to the geologic essence of the Kenai Mountains-Turnagain Arm National Heritage Areas.
But alas . . . the rest of the story.
Yet this is not just a story of geology. It is a story of how geology has affected human activity. Not only did the action of plate tectonic shove rock laced with ore-bearing veins into place; this same action provided the corridors for which to get to those ore deposits. It is these same transportation routes that have been exploited to this day.
At this point the railroad and the highway diverge. The railroad travels the corridor to the north while the highway trends westward before heading northward. They will stay separated for about 45 miles until they rejoin at Portage.
This in itself truly illustrates the connection between geology and human activity within the eastern Kenai. But perhaps a more compelling question is this: Why does the railroad and roadway diverge from the same route. It is the norm for railroads and roadways to parallel each other. Services don’t need to be duplicated and supply/construction of each can be complementary to the other. Why, in Alaska, does the railroad snake off in its own separate journey?
This is a compelling story that is worth chewing over. To help provide some discussion points the map to the right shows when certain “routes” were finished.
The discussion could cover such angles as:
• Goal of the railroad when it was started in 1903 and why this didn’t include linking the Hope/Sunrise gold fields.
• The population areas of the peninsula during the 30s and 40s.
• Established routes and desired destinations throughout peninsula.
#17 MOOSE PASS: LOCAL HISTORY, RAILROAD, AND PEOPLE
PELTON WHEEL/POWER OF COMMUNITY
Location: Moose Pass: Water wheel and park across the street
Short Description: The town of Moose Pass was originally established as a supply point for miners on their trek to the gold fields and for the construction of the railroad. However, it is the community spirit and lovely setting along Upper Trail Lake that maintains the community.
Required Equipment: None
Suggested Equipment: None
Safety Consideration: Sites lay on either side of busy highway. Use caution.
Other Info: Great place for lunch and to hang on the grass next to lake shore.
Possible Instructional Strategies:
There are several instructional opportunities at this site: however, perhaps the strongest of all is the power of community. There are three sites at this stop: the water wheel next to the Estes Store, the interpretative panel next to the shelter for the annual Solstice Festival, and the pleasant park next to the lake. All of these are results of the Moose Pass community working together on a common vision.
The Case of the Water Wheel
A stop at the Moose Pass water wheel is worth it on so many levels. It provides an opportunity to see how the energy of water can be harnessed but mostly it speaks to the resiliency of community.
The original pelton wheel was built in 1928 to supply electricity to town. It must have been quite successful for it continued to power the town up to 1956. It was restored in 1964 to provide electricity to the adjacent Estes Store. In 1980 a 10 foot water wheel was constructed with the help of local mechanics and welders. It was maintained with considerable effort by Ed Estes but then fell upon disrepair at his passing.
It has recently been restored again with the determination and spirit of the Moose Pass community. As the grindstone suggests: “If you have an ax to grind– do it here.”
#18 PRIMROSE: EFFECTS OF EARTHQUAKE AND LIFE IN THE EARLY 60’S
1964 EARTHQUAKE / LIFE IN THE 1960’s
Location: Old Primrose Bridge, just south of Mile 17
Turn off at Primrose Campground. Stop at end of pavement.
Short Description: This site is marvelous for honing the detective skills. There are enough clues that just hint to a bigger story about life in the early 1960s.
Required Equipment: Curiosity and brain cells.
Suggested Equipment: Clipboard for observations.
Safety Consideration: Students will be in a rough area between roadbed and slough. Water isn’t deep but it is wet.
Other Info: Tell students to begin taking observations immediately after turning into Primrose, off the highway.
Instructional Suggestions:
As soon as the bus leaves the highway, students should be making observations. The main one that they should note is that the road is improved and paved but then this stops abruptly at a corner. (Park at the pull off at the junction of the paved/gravel road).
After disembarking the bus, find power pole T-190 (this a short distance down the road.) Caution students about off road footing (steep and loose gravel) and to stay back from slough. Have them enter this area and make their own careful observations. There’s a story here . . . can they figure it out.
Inquiry Prompts: What’s Going On Here?
There are several visual clues in the immediate area that the students might observe. The main ones are these:
• Concrete Bridge Abutment
• Pilings in water (some intact; some are not)
• Telephone cord
• Trees between abutment and slough appear younger than adjacent trees.
• There’s more . . . but these are the main ones to help tell the story.
The Story:
This bridge was from the original Seward Highway. The paved portion that the bus first traveled on was the original roadbed. The road turned sharply here then bore straight across in a 1/2 mile long wooden piled bridge across the Snow River.
It stood the test of time and lived through many jakaloupes and raging floods. But it couldn’t withstand the power of the 1964 earthquake.
This bridge, like others in the area, failed and dropped down, forcing the pilings through the roadbed. In order to restore traffic, the Army Corps of Engineers built a gravel pad to serve as a temporary roadway for traffic.
But alas . . . the rest of the story:
(As conveyed by Tom Gillespie lifelong Seward resident)
Did you notice the telephone cord? That factors into the story as well.
Tom Gillespie was friends with John Deck whose family was one of those who lived in the Primrose area. Now John’s father was one of about 300 long shore men that worked in the Seward harbor (remember, prior to the earthquake, Seward truly was the gateway to Alaska, being the major port for the transport of materials into the state.)
None of the families had phones in their homes but there was a community phone — right under the bridge abutment. Every day John’s father needed to go down to the bridge and make a call to see if any boats were in that day.
In a time of high-speed internet and cell phones, it’s important to remember that it wasn’t so long ago that communication was not so widespread or simple.
Want More?
Assemble back at the roadway and look across the valley to the mountains above the Snow River. There are two things you might notice. First, a large swath of new vegetation covering a slide area. This land slide happened in the early 70s during heavy rainfall. The debris covered both the railroad tracks and the highway closing the transportation route to and from Seward for several days.
Keep looking higher and perched on the shoulder of the mountain and you’ll see a small square structure. This apparatus was a relay station for television in the 1960s. According to Gillespie, reception was often compromised— especially during heavy snows.
#19 MILE 14: EFFECTS OF GLACIATION: JOKULHLAUP
UNDERSTANDING JOKULHLAUPS
Location: Snow River Railroad Trestle at Mile 14
Pull-off at turn off to trestle. Bus turnaround at bottom of hill.
Short Description: A jokulhlaup (pronounced yokel—lop) is a outburst of a glacially impinged lake. The watershed of the North Fork of the Snow River includes a large glacially impinged lake. Even though visual evidence is difficult to interpret; the concept of a jokulhlaup makes this stop worthwhile.
Required Equipment: None
Suggested Equipment: Beforehand check out web site:
• http://water.weather.gov/ahps2/index.php?wfo=pafc (Explore information about Snow River)
• Photographs
• Aerial photos of the glacier and of North/South Forks for comparison
Safety Consideration: Parking is adjacent to river and Railroad Tracks.
Other Info: Outbursts happen every two to three years in the autumn – check river level on-line to determine if a jokulhlaup is occurring.
Inquiry Prompts: What’s Going on Here?
Parking by the trestle provides a view of the Snow River drainage below the confluence of the North and South Forks. At first glance it seems typical of many valley streams in the area— heavily braided flowing through glacially deposited gravel. There seems to be a great deal of dead fall along the banks and piled into log jams. At first glance this tortured wide stream bed would provide testimony to flooding that happens in any stream… but alas… if one could see it from the air.
Looking at the provided aerial photo of the confluence we can see that there is a marked difference between the North and South Forks. What’s going on here?
But alas . . . the story.
The reason for the periodic and catastrophic flooding of the North Fork is because of the Snow River Glacier in the headwaters of the watershed. As the glacier moves forward, it blocks off the stream causing a large glacially impounded lake. This lake grows to the point that it begins to float the glacier, water begins to escape out from the bottom, it then erodes a larger exit and within a few days the entire lake rushes down the valley.
The Snow River jokulhlaup is neither an unusual nor rare event in Alaska. There are a number of examples throughout the state. However, since this (and the Skilak jokulhlaup ) drains into the Kenai drainage and into populated areas it is perhaps the most notorious and the most easily viewed. Every two or three years enough water has backed up behind the glacier to cause this devastating flooding event.
#20 WOODLAWN CEMETERY: SEWARD
ANALYZING CEMETERY FOR DEMOGRAPHIC DATA
Location: Woodlawn Cemetery – Seward
From Seward Highway, turn East onto NASH RD then LEFT immediately after RAIL ROAD TRACKS. Follow main road for about 1 mile.
Short Description: The Woodlawn Cemetery was the first formal Seward city cemetery. It offers an opportunity for students to look at data from a number of perspectives then learn the dangers of following assumptions when conducting research.
Required Equipment: Clipboards, graph paper (to create map), regular paper (for notes)
Suggested Equipment: Calculators
Safety Consideration: Safety issues are low. However, safety of the resource must be considered. Please take care of the markers (many are in decayed shape) and please respect the site.
Other Info: Note – No restrooms available.
Instructional Strategies:
The Woodlawn Cemetery was a final resting place during the years that Seward was a fledgling community. Because of the limited time span (marked graves span from about 1902 to about 1928) and small concise data size (about 50 marked sites) it allows students to construct their own research question in which to collect, quantify, and display data. That in itself is a worth the trip.
But perhaps a greater lesson beyond the information they obtain, is how any conclusions that they can draw is either a) built upon assumptions b) misleading or c) down right incorrect. In fact, by itself, there is very little hard proof that can actually be discerned from the grave yard. However, the cemetery does provide a valuable spring board for questions to explore.
To Begin:
The teacher might consider just having the students mill around for a bit getting a “lay of the land” and getting a sense of what the cemetery has to offer in the form of data. Again, stress safety of the resource and respect for the community. Many markers are decayed and fragile. Please refrain from touching.
Tell students that they are about to use this cemetery as a research source. Their first job is to come up with a strategy for extracting information from this site.
After a few minutes of exploring, bring the class back together and poise two questions:
a) What is the problem with collecting data using markers? (Answer: Not all graves are marked. Some have more information than others.)
b) What are some possible research questions and strategies that can be extracted using this site:
1) Age of deceased (looking for patterns or longevity)
2) Year of Death (looking for trends throughout the years)
3) Month/Season of Death (Was there a particular time of year that experienced more fatalities.)
4) Other?
Students do not need to limit themselves to a single question; rather they can explore any or all of these . . . but how to gather, collate, and display their data? That’s the question. It will likely take a couple false starts. Encourage students to start over collecting data until they’ve found a satisfactory technique for gathering and analyzing the data. Once the students have compiled their data they can take a stab at making some conclusion . . . Or perhaps just assumptions.
Here’s a sample of what the “crunched” data set might look like (NOTE: Numbers may vary due to addition of more markers or decay of current ones).
So . . . What can be concluded from this data?
Very Little. And perhaps this is the biggest lesson of all. It’s easy when using resource (primary or not) to become sucked into making assumptions without fully validating the facts that are uncovered.
The Problem with Woodlawn:
The problem with using Woodlawn Cemetery for drawing conclusions is within its history. Simply, this hallowed ground is not a complete data set.
When Seward was first founded it was squeezed between the area surrounding the SeaLife Center and the current Jefferson Street (which was actually the sometimes raging Lowell Creek which created the outwash debris field that the town rests upon.) During the early days, the dearly deceased were planted all around the town, often in backyards. At one time Boulder Field (the gravel baseball field in town) and the land currently occupied by the hospital were once organized graveyards.
With the ever-present issue of Lowell Creek flooding and the need to expand the town, the Woodlawn property was purchased by the city in 1916. This location provided a pleasant resting place out of town with good access (the railroad ran adjacent to the property). The gravesites in town were exhumed and relocated from the city to this site. Unfortunately, Salmon Creek proved as fickle as Lowell Creek and it caused a rise in the water table making the Woodlawn site unsuitable for future burials and problematic for many that were already laid to rest at the site.
By the mid 1920’s the Woodlawn cemetery was decommissioned and many of its inhabitants were again moved to the current location in Seward behind the City Chamber of Commerce, where hopefully they can finally rest in peace.
However, perhaps the lesson of Woodlawn isn’t in the ANSWERS . . . But rather the QUESTIONS:
Perhaps by itself the Woodlawn Cemetery is short on conclusions. However, the benefit of this site (and other cemeteries as well) is not in the answers . . . but rather the questions that it provokes. What were the age demographics in Seward in the early days of the town? How was Seward effected by the flu epidemic of 1918. And what happened in the fall of 1916 for so many to perish in such a small town?
These are the compelling questions that Woodlawn poses… but can’t readily satisfy. It’s up to the researcher to look to other sources to delve into these issues.
#21 SEWARD COMMUNITY LIBRARY MUSEUM
SEWARD HISTORY
Location: Seward Community Library & Museum 239 6th Avenue, Seward, AK
Short Description: The newly constructed Seward Community & Library Museum holds a wealth of local and peninsula-wide resources for students to use for research.
Required Equipment: None
Suggested Equipment: None
Safety Consideration: None
Other Info:
• Call for hours of operation and cost. Pavilion for lunch or leg stretch is one block east.
• Phone: (907) 224– 4082
• Website
Instructional Opportunities:
The newly constructed Seward Museum and Library focuses upon Seward being the “Gateway to Alaska.” In addition to viewable exhibits the museum provides a wealth of research possibilities for students. The Seward Museum has an incredible archive of photos, newspapers, documents, and other artifacts that are indispensable to the historic researcher.
Check the website for “Bits of History” which has a number of short YouTube videos showcasing stories from Seward’s past. These make a wonderful stepping stone for starting on a research topic.
In addition, the museum has a VHF copy of the travelogue that includes Alaska Nellie Lawing.
#22 SEWARD 1964 EARTHQUAKE
1964 EARTHQUAKE: SEWARD, ALASKA
Location: Seward, AK
Short Description: The 1964 Earthquake was devastating across the peninsula. In the case of Seward it was not only devastating but also history changing. Walk through Seward with photos to try to imagine a life prior to the earthquake.
Required Equipment:
• Map (to the right)
• Photos (included)
Suggested Equipment: Clipboards and notepaper for journaling
Safety Consideration: None
Other Info: The photos provided are from locations scattered around town. This will require a fair amount of walking. Dress appropriate for weather and walking.
Instructional Strategies:
The purpose of this lesson is not only to show the destruction of the ‘64 earthquake but how it transformed Seward and really created the town that it is today.
Seward prior to the earthquake was the port city for much of Alaska. It was industrial — the gateway city. This changed on at 5:36 pm on March 27, 1964. The 9.2 magnitude tremor and the resulting tsunamis changed the course of Seward’s role as the port of Alaska. Viewing these photos of the earthquake while actually being on the site will tell a powerful story of this change and transformation.
Suggested Use: This could be presented as a sort of “treasure hunt”. Starting at one end of town, a photo of the “current” Seward could be shared. Then, with the help of the map enclosed, students would find the location that the photo was taken. Once there, students should make observations in their notebooks trying to determine what structures/features may have existed prior to 1964.
Once finished, provide the corresponding photo of the way it looked in the days immediately following the earthquake in 1964.
Determine what, if any, of this photo is still visible. Have students describe in their notebooks what this site would have been like prior to 1964. Continue through the tour comparing the photos and sites one at a time.
Again, the main goal is not to dwell on the destruction of the earthquake, but rather to reconstruct a picture of what Seward was like prior to 1964.
#23 EXIT GLACIER: KENAI FJORDS NATIONAL PARK
GLACIER DYNAMICS / CLIMATE CHANGE/ PLANT SUCCESSION
Location: Exit Glacier: Kenai Fjords National Park
3 Miles North of Seward. Turn West on Herman Leir Road and continue 10 miles
Short Description: Exit Glacier, the only site in Kenai Fjords National Park that is road accessible, provides an opportunity to study the dynamics of a receding valley glacier ecosystem.
Required Equipment: None
Suggested Equipment: Binoculars
Safety Consideration: Bear and moose habitat
Other Info: Various opportunities are available including ranger-led programs, interpretative hikes, and a nature center with interpretative displays. Call for more information.
(907) 422-0500
Instructional Strategies:
Exit Glacier is one of several glaciers creeping down from the massive Harding Ice field. Like most of the glaciers in the area, Exit Glacier is rapidly melting faster than it is moving forward. Because of this recession and its easy access, it provides a wonderful opportunity to study the revegetation of the area.
There are three main trails in the area. The “Edge of the Glacier Trail” a mostly paved trail that goes nearly to the edge of the glacier. The “Glacier View” that is a gravel trail that meanders through the forest then rejoins the “Edge” trail. Both of these are wheel chair accessible until the trail forks and starts climbing the hillside. Walking to the glacier and back will be about 2 1/2 miles RT.
These trails are excellent for viewing the dynamics of the glacier and for studying plant succession following glaciation.
The third trail (Harding Icefield Trail) is extremely strenuous and is nearly 4 miles one way.
The best way to maximize your trip into the Kenai Fjords NP is to call and make arrangements for an interpretative ranger-led walk.

These suggested field sites are just a sampling of the opportunities available to experience the history, the geology, and the archaeology of the Kenai Mountains-Turnagain Arm National Heritage Area. Perhaps you have a special site that you would recommend for school groups.

Use this blank form to use to describe your site. These can
be submitted to KMTA for addition to the web-based
version of this curriculum.

TIPS TO CONSIDER FOR FIELD TRIP SITES
There are several important things to consider when sharing a potential field study site:
PUBLIC ACCESS: Is the site legally accessible for the public?
ACCESSIBILITY: Site must be bus accessible for parking. If site requires a walk, it should be noted including the difficulty for student access.
SITE LOCATION: Provide careful directions including landmarks that will help others find the site.
SAFETY— FOR STUDENT AND RESOURCE: Student safety is paramount. So is safety for the resource. To create this curriculum, several sites were considered and then discarded solely on the basis of student safety and the fragility of the resource.
INSTRUCTIONAL STRATEGY: Suggest possible instructional strategies that a teacher might utilize if they visit the site.
FACT CHECKING: Provide enough information (making sure it is accurate) so that the site can be fully interpreted.
SUPPLEMENTAL RESOURCES: Include other resources that might be helpful in understanding the site.